End of code

Saturday 13 May 2017

Calligraphy Painted Hair with ReBornFX air dry paints

I still have a lot of practicing to do to get myself to that professional painted hair "realistic" look on my reborns but I thought I'd blog a bit on my journey with painting hair.  One of the challenges I have had in the past was to get my painted lines thin,  being able to control the paint , to go where I wanted it to go and not where it happened to land! If you have attempted painting hair on a vinyl doll head you will probably recognize my challenges with this. Some paints tend to resist the surface causing sparsely painted areas or paint blobs happening and this can be very frustrating.  Another past challenge was thinning the paints to the right consistency to prevent the paints from running and containing the color strength I wanted. Well I have to say I have finally got a method of painting hair with out having these challenges and I am now really enjoying the painted hair process. I still need to practice my patterning but at least I can now have more control over the paint application with out becoming to frustrated.
Here is now my hair painting method that works great for me........

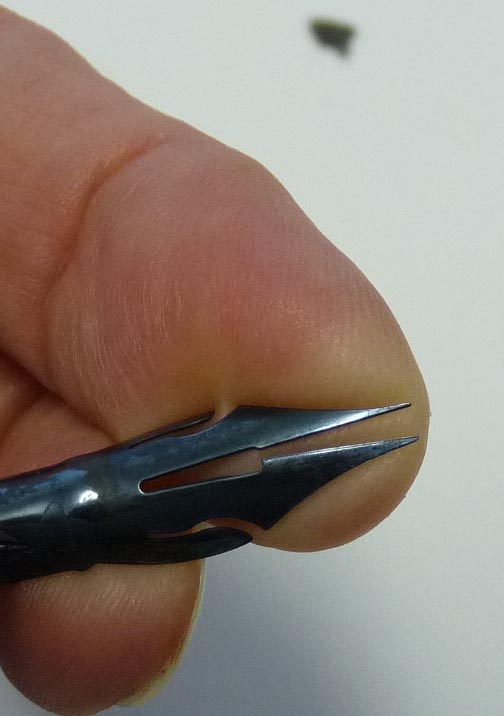
Ok, so the first thing I will tell you is that I am going to use a calligraphy nib to paint with and I (of coarse) I will be using the Reborn FX paints. I can just hear some of the Reborners scream " No no no!!! you will scratch that babies head with it!"  but the truth is, with the special soft nibs I use (from MacPherson Arts and Crafts store)  the vinyl does not get scratched at all. These nibs flex very easily and do not have a needle like point ( more like a small round point)  These nibs do give you very fine or thick lines depending on your pressure points.
The second important information is that I will be using the Rebornfx air dry paints and diluting them down easily to the right consistency for the nibs to hold with out the paints becoming runny. I also found the Rebornfx paints to have good color strength even after thinning. The Rebornfx air paint premixed line now has a few new hair colors you can choose from....
 
I will be using the ReBornFX Dark Ash Brown and the ReBornFX Ash Brown colors in my demo.
 
The vinyl doll head I will be using has been painted with Heat set paints so the first thing I will do is apply the Rebornfx air dry primer on the head where I am going to paint on and then wait for it to completely dry for a few hours. The Primer is important to use as it give a bit of tooth to your surface so the paint doesn't resist or puddle up, allowing for nice smooth continuous hair lines. This technique can also be done on air dry painted reborns before a water base varnish is applied.
Next Step: Plan out your hair pattern.  Here I have drawn on a few lines with chalk as a guidance on where I want to apply the paint for hair sections or tresses.  White chalk comes off very easily and will not discolor your paint or vinyl.

With thinned Rebornfx Ash Brown loaded  onto the calligraphy pen I applied the hair tresses within my pattern guide lines  . I like to work on the top head section first to get a good hair pattern going. If you push down on the pen to much the nib will open and release to much paint, so light pressure is all that is needed. I felt I had more control with using this pen vs a brush. It was also easy to hold and maneuver around. I also got to paint more hair lines with out stopping to load up with paint vs with a fine brush. So I felt is was a bit faster for painting as well.

The next step I did was to take a small brush and load it up with a thin wash of the Rebornfx Light Ash Brown and applied it with in the hair tresses sections. This softened the hair lines and made it look nicely blended into the scalp as well as defined the hair tresses more.
 
 
I then loaded the calligraphy pen with thinned Rebornfx Dark Ash Brown and applied it at the top of the tresses to create shadow and density.
You will notice I am starting to connect my top hair section to the sides now. I also changed to a smaller pen nib to give me some very fine lines on the sides as shown below. I also added a bit of light flesh paint hair lines on the sideburns.
This is how far I have gotten for now. I am liking the density and separation of the tresses so far. This is enough detail for now on the top of the head , so I will now go on to painting in the rest of the hair on the head. Once all the hair is placed in, then I will reassess where I want to add more details, highlights or shadows and then apply.
After I am finished I can choose to seal and varnish with Air Dry Rebornfx mediums or with a heat set medium such as Genesis Satin Medium. Rebornfx paints will withstand the heating process required for heat set paints with out changing color.


Monday 8 May 2017

RebornFX now has 60 colors available!

Great announcement; the ReBornFX  premixed air dry paint line has now reached  its' 60th color! We just added a new color called Harvest Cream today and will soon be put on the website https://macphersoncrafts.com/en/online-store/rebornfx/rebornfx-air-dry-paints/results,46-105
for purchase. A color swatch is posted in the new products tab on this blog. The color is a very creamy light yellow with just a touch of green reflection. It is good to use when you want to add a soft yellow hue to blend into your skin tones. As a mottle color it helps to break up the reds and when used as a wash it can soften blushed areas. It also is great as a high light color in blonde painted hair.
I am definitely going to give this new color a try and will post my pictures when completed.
ReBornFX air paints are going strong and will still be adding more new colors to their line!
 

Sunday 23 April 2017

Cleaning and Preparing Vinyl for painting

I am getting ready to paint another vinyl doll and thought I'd post what I do to prepare the vinyl doll parts before painting them. There are many different types of vinyl's that come from various reborn doll kit factories around the world. I have found some doll kits to be very "clean" and easy to prepare and some are a bit dirty and need more attention to cleaning off residues. With my experience from helping inspect ( at work ) a ton of vinyl doll parts coming in from a wide variety of doll factories, I can tell you I have not come across  a  factory that has a total "clean vinyl " record. There are times when you may have a good run of really clean looking doll vinyl parts from a factory that impresses you and then the next run from that factory that impression can change. Taking this information into account, I now thoroughly clean my vinyl pieces on every kit before I paint them regardless of which factory produced them. After many hours of painting I do not want to chance finding out the paint won't stick to an area due to an oily residue that I did not see and take the time to clean off before hand. It really doesn't take that long to do a thorough cleaning and I feel it is small task well worth the effort in the end.
So here is my cleaning procedure and a recipe for my cleaning solution that has worked for me for many years.
The supplies you will need are;
1 soft bristled tooth brush
1 tsp of baking soda (sodium bicarbonate U.S.P.)
3 Tbls of Dawn dish detergent
1 small container
Warm water
Soft towel


I mix the baking soda and dish detergent into the small container to make a soft paste.
The Dawn dish detergent has a great grease cutting ingredient that works well on the vinyl. You may try other brands of dish detergent, but make sure it is not loaded with hand softening oils.  I added in the baking soda to get more of a soft abrasion to help loosen any stuck on dirt or oils. It also helps reduce any odor from the vinyl. The baking soda did not scratch or leave marks in the vinyl.

 
 I then apply this cleaning paste onto the vinyl doll parts and then lightly scrubbed it all over.
 Ensure you scrub in-between the toes, fingers and other creases or crevices.

 
Rinse off the paste thoroughly with warm water. Some times a second rinse is necessary to get all the soap residue off the vinyl. Very warm water helps remove the residue better than cold water. The warm water also helps to open up the vinyl "pores" aiding in releasing trapped oils. As to how warm the water is = it is as warm as your hands can comfortably take. Do not scald yourself with water that is to hot to handle!

 
Dry off the vinyl parts with a soft absorbent towel. I do not use paper towels as I found that they often leave lint or "fuzzies" behind after use.
I  now put my vinyl doll parts onto a rack to dry for a few hours. This ensures any missed wet areas have a chance to air dry. Some times if I am in a hurry to paint right away, I will use a hair dryer on low or cool heat setting to quicken this secondary air drying procedure.
 
I should also mention Do Not get the inside of the vinyl parts wet as it is very hard to get the insides completely dry. If the inside ends up being moist for a long period of time, it can cause mold growth. Something you really do not want to take a chance on happening so try your best not to get water inside the vinyl doll parts. One tip to use if you want to help keep the water from getting into the parts;  Cover the holes by placing a piece of plastic over the flange and secure with an elastic. This will help make it water resistant from drips. It will not work if the area is submerged under water.


Wednesday 19 April 2017

Using a reborn for Decorating

Had a busy weekend with my family for the Easter Holidays. My home was host to a baby shower for my daughter who is expecting in May. This will be my first Grand child. We made a diaper cake for the table center piece and used my painted reborn Marlee (sculpt by M.Winters) as the cake topper. It was a great conversational item and my daughter adored it.

Sunday 9 April 2017

Fixing a vinyl hole with 3D medium

I decided to try out the RebornFX 3D medium to fill  a hole that was left from a bubble in the vinyl at the back of the neck. Found out it worked out well! Usually I would fill any holes with the heat set vinyl putty medium but I didn't want to heat my vinyl up. That is why I decided to try out the 3D medium for this. I sticks onto the vinyl permanently and is very flexible once air dried.  Here are a few snap shots of my experiment.
Filled the hole with the RebornFX 3D medium and blend out over and around the hole area.
 Left to air dry over night then painted a few skin tones on top. After paint was dry, I bent the neck area and flexed it a few times. All held together with no cracking.
Since the 3D medium worked to well with adhesion and filling in a hole, I decided to apply a thin layer of the ReBornFX 3D medium onto this thin layer of vinyl on the ear lobe. This will reinforce this thin vinyl area to strengthen and prevent any punctures.

Monday 3 April 2017

London Doll show

This past weekend I was helping in a booth at the London Ont. Doll and Teddy Bear Show. It was a great show with good attendance. Here are a few of the painted reborn dolls that were up for sale in the booth I was helping in.
 
 A few times when the booth wasn't busy I got to work on my Gabriela Toddler Doll nails. That was one of the high lights and advantages of working with the Rebornfx Air dry paints. It is very portable and you can use it almost anywhere with out depending on having a heating oven or heat gun as you do with the Genesis Heat Set paint. I enjoyed this opportunity to paint Gabriela's nails and found it very convenient to use.
 
 
I was pleasantly pleased with a customer's (Ruth from Blessed Baby Creations) results from using the Rebornfx air dry 3D medium for enhancing her dolls nail tips. She claimed it was very easy to apply and she loved the results as well. I think they look great!


Saturday 1 April 2017

Finishing skin layers with ReBornFX paints

I got to apply the last layer of skin onto my toddler doll Gabriella. The color I used was a mix of Rebornfx Flesh 07  and Rebornfx Caramel Cream. About 20 % was the Flesh 07 in the mixture. I then added in 50% Rebornfx Emulsion medium and 25% Diluent as I wanted this layer to be very transparent. This was applied with a torn cosmetic sponge, pouncing lightly. You should still see all your blushing and creases through this. If not then it is to strong and you need to dilute the paint mix more with Emulsion or Diluent. Do not apply this onto the bottoms of the feet, palms, lips or nails.  the next step was to paint on the eyebrows. This seemed easier for me to do on a large head and getting them to match the first attempt was exciting.  The colors I used for the eyebrows were Rebornfx Burnt Umber and Rebornfx Light Ash Brown to match the hair wig. The brow hairs were applied with a very fine liner. Once dry I then added on a layer of Matte Fluid to reduce any shine then I applied the Sealer to all areas. The only thing I will be working on to finish her is the nails and assembling.  For now I tried on the wig I have for her. Here is the result of my painting of the head and torso so far.